Jupyter Notebooks are a very powerful tool to know when you are working with Python. It allows you to iterate faster over code changes, executing specific sections of the code without the need of running it all. As an example, we used it for our Basic K-Means implementation post, where we can see the code output at different moments.
Advantages of using Jupyter Notebook
The main advantage of using Jupyter Notebooks is to be able to make changes on your code much faster than usual:
- Execute just a part of the code while retaining the execution from other parts
- Reuse variables between all parts of the code
- Execute slow pieces of code once and play with the output as many times as you need
For example, let’s imagine that you are requesting information from an API, something like:
import requests

# This API returns the weather forecast for a location
url = 'https://api.open-meteo.com/v1/forecast?latitude=39.47&longitude=-0.38&hourly=temperature_80mr=true'

req = requests.get(url)
This API returns a JSON with the following format (note that we do not show the complete JSON):
{
"latitude": 39.47,
"longitude": -0.3800001,
"generationtime_ms": 0.20396709442138672,
"utc_offset_seconds": 0,
"timezone": "GMT",
"timezone_abbreviation": "GMT",
"elevation": 20,
"hourly_units": {
"time": "iso8601",
"temperature_80m": "°C"
},
"hourly": {
"time": [
"2023-02-08T00:00",
"2023-02-08T01:00",
"2023-02-08T02:00",
"2023-02-08T03:00",
"2023-02-08T04:00",
"2023-02-08T05:00",
"2023-02-08T06:00",
"2023-02-08T07:00",
"2023-02-08T08:00",
"2023-02-08T09:00"
],
"temperature_80m": [
8.8,
8.8,
8.6,
8.3,
8.5,
8.8,
8.9,
8.9,
9.2,
9.9
]
}
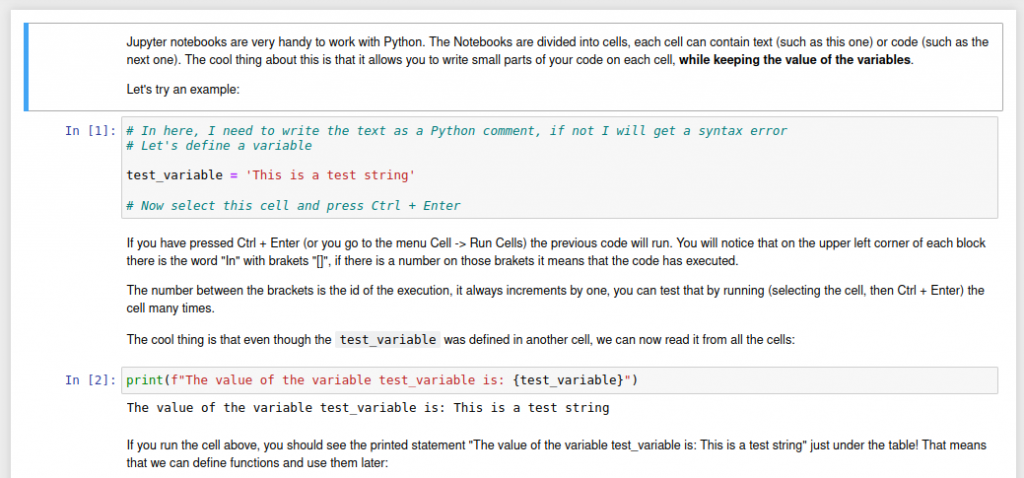
}If you run the previous code in a cell of a Jupyter Notebook, you can access the variable `req` as many times as you like without calling the API again! And, in case you want new data, just execute that cell again.
Running our tutorial notebook
To get the most of this post we encourage you to download the code from our repository. It is expected that you have all the necessary tools installed, if not please follow our setup tutorials for Windows or Linux.
Once everything is set up, we can run the notebook by activating our virtual environment, moving to the code directory and executing Jupyter Notebook:
jupyter notebookYou should see a link on the terminal that looks something like:
http://localhost:8888/?token=15de71c810116f551bdb007efc6f8e68593d9f374316bd6d
Just copy and paste that URL on your preferred browser, and you will see something like:
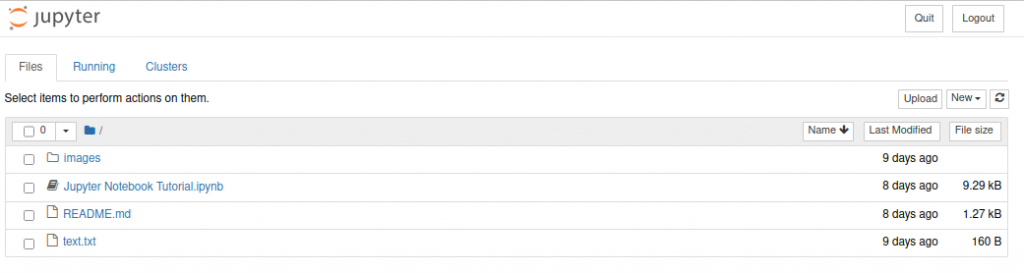
Click on the “Jupyter Notebook Tutorial.ipynb” file and you will be able to play with it!
The code is self guided, just follow the instructions and you will learn Jupyter Notebook in no time!
Common shortcuts
Here is a small list of shortcuts that you can practice!
Command Mode (press Esc to activate):
Enter: switch to Edit ModeShift+Enter: run cell, select belowCtrl+Enter: run cellAlt+Enter: run cell, insert belowA: insert cell aboveB: insert cell belowX: cut selected cellC: copy selected cellV: paste cell belowZ: undo last actionY: change cell to codeM: change cell to markdown1-6: change header levelUp Arrow: select cell aboveDown Arrow: select cell belowL: toggle line numbersO: toggle output of selected cellShift+Space: scroll notebook upSpace: scroll notebook down
Edit Mode (press Enter to activate):
Tab: code completion or indentShift+Tab: tooltipCtrl+]: indentCtrl+[: dedentCtrl+A: select allCtrl+Z: undoCtrl+Y: redoEsc: switch to Command Mode


0 Comments